 RISC-V 测试矩阵
Debian @ Lichee RV Dock 测试报告
支持状态
BASIC
系统版本
13
最后更新
2025-10-22
Debian 13 D1 测试报告
测试环境
操作系统信息
- 系统版本:Debian 13 Trixie
- 来源:通过
sudo debootstrap --arch=riscv64 trixie rootfs http://deb.debian.org/debian创建一个 rootfs烧录到内存卡
硬件信息
- Sipeed Lichee RV Dock 一块
- 电源适配器一个
- MicroSD 卡一张(推荐大于 8 GB)
- USB to UART 调试器一个
涉及的仓库
- https://github.com/riscv-software-src/opensbi.git
- https://github.com/smaeul/u-boot.git
- https://github.com/jamesgraves/licheerv-debian-linux/blob/main/licheerv_linux_defconfig
安装步骤
OpenSBI
从 github 克隆一份源码
git clone https://github.com/riscv-software-src/opensbi.git编译
make CROSS_COMPILE=riscv64-linux-gnu- PLATFORM=generic FW_PIC=y -j$(nproc)注:生成文件路径为 build/platform/generic/firmware/fw_dynamic.bin
U-Boot
从下面这个仓库克隆 d1-wip 分支里的源码
git clone https://github.com/smaeul/u-boot.git -b d1-wip配置后进行编译
make lichee_rv_dock_defconfig

make CROSS_COMPILE=riscv64-linux-gnu- OPENSBI=../opensbi/build/platform/generic/firmware/fw_dynamic.bin -j$(nproc)
编译结束会生成一份 u-boot-sunxi-with-spl.bin 文件
之后要烧录到内存卡
Linux Kernel
首先从此仓库的 d1/all 分支克隆一份内核的源码
从此仓库下载 config
git clone https://github.com/smaeul/linux.git -b d1/all

从这里搞一个 rv dock 的 config 文件:https://github.com/jamesgraves/licheerv-debian-linux/blob/main/licheerv_linux_defconfig
配置并编译
编译后生成的文件在 arch/riscv/boot/Image
make ARCH=riscv licheerv_linux_defconfig

make ARCH=riscv CROSS_COMPILE=riscv64-linux-gnu- KCFLAGS='-fno-asynchronous-unwind-tables -fno-unwind-tables' -j$(nproc)
extlinux.conf
注:这份文件内包含启动参数
rootfs 的位置请按需修改
Label Debian
	LINUX /Image
	APPEND root=/dev/mmcblk0p2 rw rootwait console=ttyS0,115200 earlycon=sbi
rootfs
这部分是烧录 rootfs 的步骤
开头也有提到
mkdir rootfs

sudo debootstrap --arch=riscv64 trixie rootfs http://deb.debian.org/debian
然后 chroot 进去设置个密码 装点需要的软件包
sudo chroot rootfs

passwd

apt update

apt install ...

exit
rootfs 镜像
关于 rootfs 镜像
首先建立一个 1 GB 的镜像
然后挂载并把 rootfs 复制到镜像中
dd if=/dev/zero of=rootfs.img bs=1G count=1

sudo mkfs.ext4 rootfs.img

mkdir rootfs_mount

sudo mount rootfs.img rootfs_mount

sudo cp -rfp rootfs/* rootfs_mount

sudo umount rootfs_mount

rm -r rootfs_mount

sudo e2fsck -f rootfs.img

sudo resize2fs -M rootfs.img
烧录
注:写在前面,需要先确定 sd 卡的设备路径 sudo lsblk
- 规划一下内存卡的分区 此处分了一个 boot 和 rootfs
sudo sgdisk /dev/sdb -o

sudo sgdisk /dev/sdb --new=1:4096:69631 --change-name=1:boot

sudo sgdisk /dev/sdb --new=2:69632: --change-name=2:rootfs

sudo sgdisk /dev/sdb -p- 写入引导文件
sudo mkfs.vfat /dev/sdb1

sudo dd if=./u-boot/u-boot-sunxi-with-spl.bin of=/dev/sdb seek=256

sync- 拷贝内核和 extlinux.conf
sudo mount /dev/sdb1 /mnt

sudo mkdir /mnt/extlinux

sudo cp ./linux/arch/riscv/boot/Image /mnt/

sudo cp ./extlinux.conf /mnt/extlinux/

sync

sudo umount /mnt- 写入 rootfs
sudo dd if=./rootfs.img of=/dev/sdb2 bs=4096
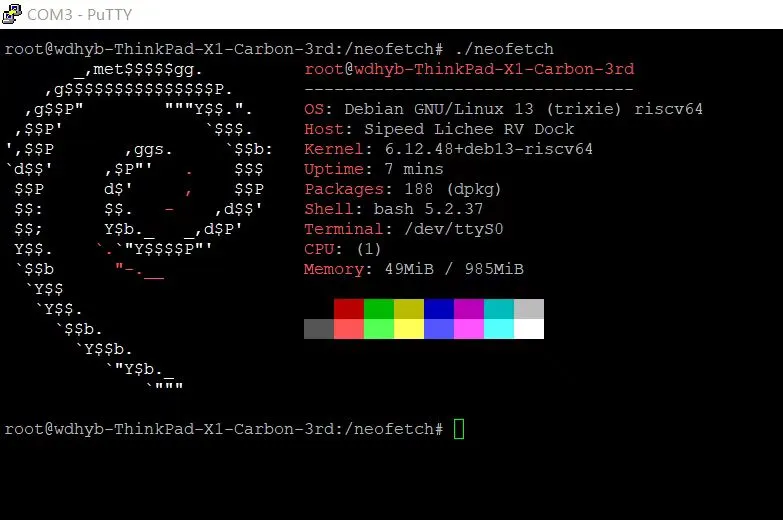
sync实际结果
neofetch
启动信息
root@wdhyb-ThinkPad-X1-Carbon-3rd:~# uname -a
Linux wdhyb-ThinkPad-X1-Carbon-3rd 6.1.0-rc3-443875-gb466df90d48f #1 PREEMPT Sat Oct  4 20:28:29 CST 2025 riscv64 GNU/Linux
root@wdhyb-ThinkPad-X1-Carbon-3rd:~# cat /etc/os-release
PRETTY_NAME="Debian GNU/Linux 13 (trixie)"
NAME="Debian GNU/Linux"
VERSION_ID="13"
VERSION="13 (trixie)"
VERSION_CODENAME=trixie
DEBIAN_VERSION_FULL=13.1
ID=debian
HOME_URL="https://www.debian.org/"
SUPPORT_URL="https://www.debian.org/support"
BUG_REPORT_URL="https://bugs.debian.org/"
root@wdhyb-ThinkPad-X1-Carbon-3rd:~# cat /proc/cpuinfo
processor       : 0
hart            : 0
isa             : rv64imafdc
mmu             : sv39
uarch           : thead,c906
mvendorid       : 0x5b7
marchid         : 0x0
mimpid          : 0x0
测试结论
系统正常启动,能够通过串口登录。
来源: 支持矩阵