 RISC-V Test Matrix
System Version
24.03-LTS-SP4
Status
CFT
System Variant
RVA23-OLK-generic
Last Update
2026-09-15
openEuler CoM260 Kit Test Report
Test Environment
System Information
- System Version: openEuler 24.03 LTS SP4 (RVA23-OLK-generic)
- Download Links:
- System image: openEuler-24.03-LTS-SP4-RVA23-OLK-generic.img.zst
- Image checksum: openEuler-24.03-LTS-SP4-RVA23-OLK-generic.img.zst.sha256sum
- Bootloader package: bl-spacemit-k3-RVA23.tar.zst
- Bootloader checksum: bl-spacemit-k3-RVA23.tar.zst.sha256sum
- Reference Installation Documentation: Here
Hardware Information
- CoM260 Kit, 16GB RAM / 128GB Storage
- DC Input (chassis rating): 19V / 2.37A or 12V / 5A
- USB-to-TTL Serial Adapter and Jumper Wires
- SD/TF card and USB card reader, or a USB drive; media capacity must exceed the decompressed image size
- Network and Ethernet Cable
Installation Steps
A complete official installation procedure for these openEuler SP4 files on CoM260 Kit has not been confirmed.
Download the Flashing Tool
Install the download and decompression tools on the Ubuntu host:
sudo apt install wget zstdFlash the Image
The following steps write the system image to an SD/TF card through a USB card reader, or to a USB drive, on the Ubuntu host. The SD boot procedure below requires an existing, working U-Boot on the board.
-
Create a working directory and download the system image, bootloader package, and their checksum files:
mkdir -p openeuler-com260 cd openeuler-com260 wget -c https://dl-cdn.openeuler.openatom.cn/openEuler-24.03-LTS-SP4/embedded_img/riscv64/spacemit/com260/openEuler-24.03-LTS-SP4-RVA23-OLK-generic.img.zst wget -c https://dl-cdn.openeuler.openatom.cn/openEuler-24.03-LTS-SP4/embedded_img/riscv64/spacemit/com260/openEuler-24.03-LTS-SP4-RVA23-OLK-generic.img.zst.sha256sum wget -c https://dl-cdn.openeuler.openatom.cn/openEuler-24.03-LTS-SP4/embedded_img/riscv64/spacemit/com260/bl-spacemit-k3-RVA23.tar.zst wget -c https://dl-cdn.openeuler.openatom.cn/openEuler-24.03-LTS-SP4/embedded_img/riscv64/spacemit/com260/bl-spacemit-k3-RVA23.tar.zst.sha256sum -
Verify both downloads in that directory. Continue only after both checks report
OK:sha256sum -c openEuler-24.03-LTS-SP4-RVA23-OLK-generic.img.zst.sha256sum sha256sum -c bl-spacemit-k3-RVA23.tar.zst.sha256sum -
Decompress the image while retaining the original archive:
zstd -dk openEuler-24.03-LTS-SP4-RVA23-OLK-generic.img.zst -
Insert the SD/TF card into the USB card reader and connect it to the Ubuntu host, or connect a USB drive. Identify the target media by its capacity and model:
lsblk -o NAME,TRAN,SIZE,MODEL,FSTYPE,MOUNTPOINTSReplace
/dev/sdXin the following commands with the actual whole-device path of the target card or USB drive. A built-in card reader may instead use/dev/mmcblkN, with partitions such as/dev/mmcblkNp1; substitute the paths shown bylsblk. Writing the image erases all data on the selected media. -
Unmount each mounted partition on the target media. The following example uses partition 1; replace it with the actual partition path shown by
lsblk. Skip this step if no partitions are mounted:sudo umount /dev/sdX1 -
Write the decompressed
.imgfile to the entire card or USB drive. Setofto the whole device, such as/dev/sdX, rather than a partition such as/dev/sdX1:sudo dd if=openEuler-24.03-LTS-SP4-RVA23-OLK-generic.img of=/dev/sdX bs=4M status=progress conv=fsync -
Wait for
ddto finish without errors and return to the shell prompt, then flush pending writes and eject the media:sync sudo eject /dev/sdXOnce ejection succeeds, remove the SD/TF card from the reader and insert it into the board’s TF-Card slot with the board powered off. Locate the slot using section 5.12 of the board guide. A USB drive connects to a USB-A port instead.
Logging into the System
Orient the board as shown below, with the USB and Ethernet ports at the bottom and the header at the top. Count positions from the left end of the header toward the right, and connect the USB-to-TTL adapter using 3 jumper wires:
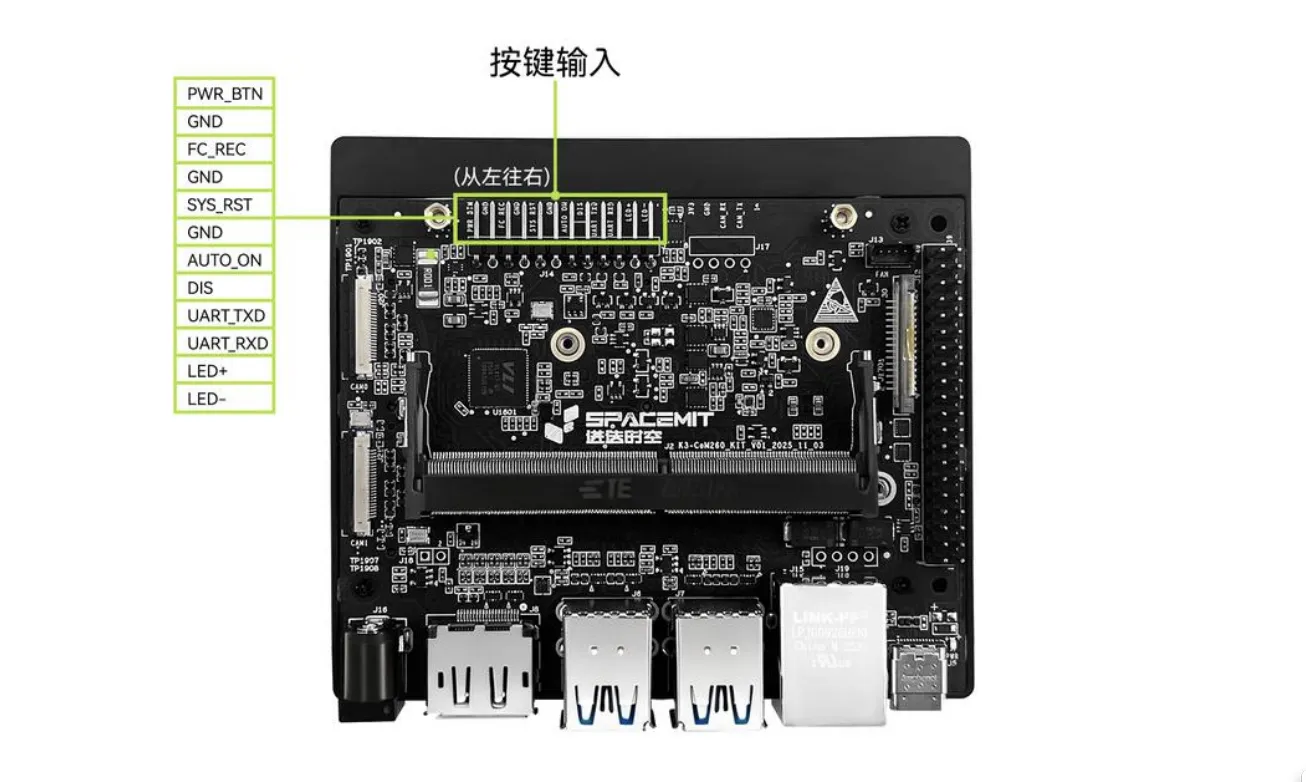
| Position counted from the left | CoM260 signal | USB-to-TTL adapter |
|---|---|---|
| 6th | GND | GND |
| 9th | UART_TXD | RXD |
| 10th | UART_RXD | TXD |
Confirm that the UART signal voltage levels match before connecting. With the board powered off, connect the wires according to the adapter’s pin labels. Leave the adapter’s VCC disconnected, power the board through DC, and connect the adapter’s USB end to the Mac or Linux host.
Mac host:
After installing Homebrew, install tio with:
brew install tioFind serial devices in the Mac terminal:
find /dev -maxdepth 1 -name 'cu.*'If multiple devices appear, compare the output before and after plugging in the USB-to-TTL adapter to identify the new device. The following command uses /dev/cu.usbserial-1140 as an example serial device name; replace it with the device name found on your system:
tio -b 115200 /dev/cu.usbserial-1140Linux host:
Install tio on Ubuntu / Debian:
sudo apt update
sudo apt install tio
For other Linux distributions, install tio using the appropriate package manager.
Find serial devices in the Linux terminal:
find /dev -maxdepth 1 \( -name 'ttyUSB*' -o -name 'ttyACM*' \)If multiple devices appear, compare the output before and after plugging in the USB-to-TTL adapter to identify the new device. The following command uses /dev/ttyUSB0 as an example serial device name; replace it with the device name found on your system:
sudo tio -b 115200 /dev/ttyUSB0tio defaults to 8N1 with flow control disabled.
Boot from an SD/TF card (pending verification):
The openEuler SP3 announcement describes SD-card support and booting through extlinux.conf on CoM260. The following procedure combines that boot method with the available U-Boot interface; it has not been verified with this SP4 image.
-
With the written card in the board’s TF-Card slot, connect the serial terminal, power on the board, and interrupt the automatic boot countdown to reach the U-Boot
=>prompt. These MMC commands address the native card slot; a card connected through a USB reader uses the USB storage interface. -
List the MMC controllers. The example uses device
0; replace it with the actual SD-card controller number:mmc list mmc dev 0 mmc rescan mmc info part list mmc 0Continue only after the card and its partition table are recognized successfully.
-
Inspect the boot partition, shown here as partition
1; use the actual partition number. Confirm thatextlinux/extlinux.confand its referenced kernel, initramfs, and device-tree files are present:ls mmc 0:1 / -
With
spacemit/k3_com260.dtbpresent under the device-tree directory used by the boot configuration, select it for the current U-Boot session and scan the SD card for a bootable configuration:setenv fdtfile spacemit/k3_com260.dtb bootflow scan -lb mmc0mmc0selects MMC device0; adjust it if the controller number differs. The environment change is temporary. The U-Boot bootflow documentation defines-las listing bootflows and-bas attempting to boot them. Successful system startup and serial login remain to be verified.
Common Issues
The Type-C port handles data transfer and firmware flashing but does not power the board; connect power through DCIN.
Expected Results
The system boots up successfully and allows login through the serial port.
Actual Results
CFT
Test Criteria
Successful: The actual result matches the expected result.
Failed: The actual result does not match the expected result.
Test Conclusion
CFT
Source: Support Matrix